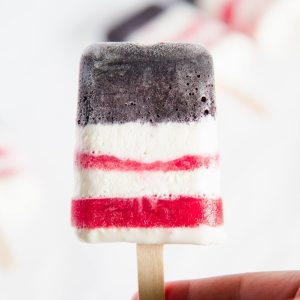
Red White and Blue Cheesecake Popsicles
These easy-to-make red, white, and blue popsicles are perfect for any Memorial Day or Fourth of July celebrations! Creamy cheesecake combined with blueberries, and raspberries, creates a delicious frozen treat perfect for any hot summer day!
Equipment
- a popsicle mold you can also use small paper cups to make these homemade popsicles!
- popsicle sticks
- upright blender
- plastic squeeze bottles, or resealable plastic bags, for easily creating layers!
- food-safe freezer bag or zip-top bag for storing
Ingredients
- 1 8 oz block cream cheese softened
- 1/2 cup plain Greek yogurt or sour cream
- 1/2 cup white sugar
- 1/2 cup whole milk
- 1 tsp vanilla extract
- 1 cup frozen blueberries thawed
- 1 cup frozen raspberries thawed
- 2 tbsp simple syrup, or sweetener of choice optional
Instructions
- In an upright blender, combine the thawed blueberries and 1 tbsp of simple syrup, and puree until smooth. Transfer the finished mixture into a plastic squeeze bottle, or a resealable bag, and set aside. If your mixture looks a little too purple you can add a few drops of blue food coloring to help create a deep blue.
- Rinse out your blender, then prepare the raspberry mixture. Combine the thawed raspberries with 1 tbsp of simple syrup and puree until smooth. Transfer the finished mixture into a plastic squeeze bottle, or a resealable bag, and set aside.
- The cheesecake mixture can either be made in your upright blender(though you might need a little extra milk.) Or it can be made in a large bowl and mixed with beaters.
- Combine, the softened cream cheese, Greek yogurt, sugar, milk, and vanilla extract, and mix until smooth. Transfer the finished mixture into a plastic squeeze bottle, or a resealable bag, and set aside.
- Place the raspberry mixture and the cheesecake mixture in the fridge until ready to use. If you are using resealable plastic sandwich bags, carefully cut off the tip of one corner of each bag when you are ready to add that layer.
- To create the blueberry layer, gently squeeze the blueberry mixture into each mold, filling them roughly 1/4 of the way up. Place a popsicle stick into each mold, be sure to push it down all the way, so that it is touching the bottom of each mold. Place the popsicles in the freezer and allow them to freeze for 30-40 minutes before adding the next layer.
- Now for the white and red, you can make as few or as many layers as you want. I did 3 white layers, and 2 red layers, but you easily just do one of each, or add as many layers as your popsicle molds can fit!
- Once the blue layer is frozen, add the white layer. Gently squeeze the cheesecake mixture into each mold, adding as much or as little as you like, depending on how many layers you are planning to make. Return the popsicles to the freezer and allow them to freeze for 30-40 minutes before adding the next layer.
- For the red layer, gently squeeze the raspberry mixture into each mold, adding as much or as little as you like, depending on how many layers you are planning to make. Return the popsicles to the freezer and allow them to freeze for 30-40 minutes before adding the next layer.
- Repeat with the cheesecake and raspberry layers until you have reached your desired look. Once you have added the final layer allow the finished popsicles to freeze for 4-6 hours or overnight before serving.
- Enjoy!
Notes
These red, white, and blue popsicles can be stored in a freezer bag or freezer-safe airtight container and frozen for up to 3 months!
If you are having trouble getting your berries to blend, or you would like to thin out the mixture a little more, feel free to add some water to help everything blend smoothly and create a thinner mixture.
You can also use, honey, maple syrup, agave nectar, or white sugar to sweeten the blueberry and raspberry purees. Or you can skip the sweetener altogether!
If you aren't a fan of cheesecake or are looking to simplify this recipe, you can easily use vanilla yogurt, or even homemade lemonade in place of the cheesecake mixture.
Getting your popsicles out of the mold can often be tricky, and is honestly one of the hardest parts of making homemade popsicles. Thankfully I found, a quick, easy, and nearly fool-proof way to get popsicles out of the mold!
Fill a dish, or a sink, that is roughly the height of your mold, with warm water(warm NOT hot water). Gently place the mold in the water, be sure that the water doesn’t touch the popsicles themselves, just the mold.
Allow the mold to sit in the water for 20-30 seconds, remove it from the water, gently wiggle the popsicles around, and pull them out.
I like to place my popsicles on a baking sheet and put them back in the freezer for 10-15 minutes after they have been removed from the mold. This allows them to freeze solid again, without sticking to each other!
Nutrition
Serving: 1popsicleCalories: 66kcalCarbohydrates: 15gProtein: 1gFat: 1gSaturated Fat: 0.2gPolyunsaturated Fat: 0.1gMonounsaturated Fat: 0.1gTrans Fat: 0.001gCholesterol: 2mgSodium: 9mgPotassium: 54mgFiber: 1gSugar: 13gVitamin A: 28IUVitamin C: 4mgCalcium: 26mgIron: 0.2mg
Tried this recipe?Let us know how it was!